What is image optimization?
SEO image optimization is the process of making images on your page more accessible for both users and search engines. Although not mandatory, it’s good practice to boost your search rankings and improve user experience. Pages without image optimization for SEO often load slower and rank lower in the SERP.
Common image and graphics optimization tactics include choosing the right format, size, resolution, metadata, etc. to enhance your SEO. Once you start optimizing images on your website, you won’t want to go back, since it greatly enhances the website’s performance.
Why is it important to use images in your blog post?
Using images in your blog posts is crucial for several reasons:
- Enhanced Engagement and Retention: Images make your content more engaging and easier to consume. They help break up text and add visual interest, increasing reader retention and engagement. Studies have shown that content with images receives 94% more views than content without images.
- Faster Processing: The human brain processes visual information much faster than text. Scientifically, it is noted that images are processed by the brain as quickly as 13 milliseconds, which is significantly faster than textual content. This rapid processing makes visuals a powerful tool for communication.
- SEO Benefits: Including images can also improve your blog’s SEO. Image SEO optimization can provide additional content for search engines to index, and if properly tagged with alt text, they can improve your visibility in search results.
- Emotional Connection: Images can evoke emotions and help tell a story, adding a deeper layer to your content. They can make abstract concepts concrete and provide a richer user experience.
What does this mean exactly? Incorporating images into your blog makes it more attractive and engaging and enhances the effectiveness of your communication and marketing efforts. It’s a win-win for everyone.
How do images affect SERP rankings
Images are supplementary in influencing a web page’s search engine results page (SERP) position. Optimized images can improve user engagement and experience while enhancing a website’s overall performance, which Google and other search engines prioritize.

Ahmet Kaplan Elçi, a pioneering SEO expert since the early days of Google and founder of TAXIYO
“Images within a text-based blog post do not directly influence its ranking on SERPs. However, they might have an indirect impact. Multiple images within posts fall under the ‘Media Rich’ category, where media is taken as a supportive media element, which helps rank better than other pages having similar information with text-based only.”
Factors like reducing image file sizes to speed up page loading and using SEO-friendly file names highlight the importance of images in SERPs.
But what does all this mean? In the next section, we’ll dive straight into the best practices for SEO-friendly images. Ready? Let’s go.
14 Best practices for image SEO
1. Use unique and high-quality images
Opt for unique and original images whenever possible. These can significantly enhance your SEO by making your content stand out. Google and other search engines favor original visual content, which can lead to higher rankings in search results.
What does this mean? Use your own photos when you can. They might not be as pretty as those stock images, but they are unique.
But does this mean that Google will penalize people who use stock photos? Ahmet says no.
Ahmet Kaplan Elçi, a pioneering SEO expert since the early days of Google and founder of TAXIYO
“A well-prepared blog post,” he states, “can still rank better even through stock photos. But compared to stock images, original images are more advantageous for ranking in a better position and easier to use. Since the image will be indexed in your content for the first time, you do not need to make any extra effort to add more value. The original owners of the content or media are rewarded by search engines in the long run if they stay up to date.”
2. Choose the right image format
Selecting the appropriate image format is essential to balancing quality and page performance. Here are the primary image formats, along with their pros and cons:
- JPEG (Joint Photographic Experts Group):
- Pros: It is best for photographs and illustrations due to its high compression rate, which offers good image quality at small file sizes. It is also widely supported across browsers.
- Cons: Uses lossy compression, meaning image quality may degrade when repeatedly edited or compressed. It also lacks transparency support.
- PNG (Portable Network Graphics):
- Pros: It supports transparency and provides lossless compression, meaning image quality remains intact after editing. It is ideal for graphics, logos, and images with text or sharp edges.
- Cons: Larger file sizes compared to JPEG due to lossless compression.
- WebP:
- Pros: Developed by Google, WebP provides high-quality images with lossy and lossless compression, often resulting in smaller file sizes than JPEG or PNG. It also supports transparency and animations.
- Cons: Some older browsers lack native support, necessitating fallback formats.
- SVG (Scalable Vector Graphics):
- Pros: Vector-based format that maintains quality at any scale. Ideal for logos, icons, and simple graphics. Easily manipulated via CSS and JavaScript.
- Cons: Not suitable for complex images like photos. May have security implications if mishandled.
- GIF (Graphics Interchange Format):
- Pros: Supports animations and basic transparency. Best for simple animations like banners or icons.
- Cons: Limited to 256 colors, making it unsuitable for detailed images or photos.
By understanding the strengths and weaknesses of each format, you can choose the best one for your travel blog images. This can lead to faster page load times, improved user experience, and better SEO rankings.
- BMP (Bitmap):
- Pros: Simple and widely accepted format, especially in Windows environment. Since it is not compressed and retains great detail, BMP is ideal for editing.
- Cons: Less versatile than JPEG or PNG. BMP does not support advanced compression and can take up more storage space. Supports limited color depth.
- AVIF (AV1 Image File Format):
- Pros: Supports compression without losing image quality, reduces file size in contrast to other image formats. Particularly important for HDR images.
- Cons: Not supported by many platforms, for example, Google. Requires processing power for decoding, which may slow down older devices.
The best image format for your blog depends on different factors, such as image quality, file size and website performance. JPEG is a traditional choice with a good balance between quality and file size. PNG usually has a larger file size as it retains more details and is perfect for graphics, logos, etc. For many websites, WebP can also help balance out quality, compression, and compatibility. Whatever image format you choose, make sure to test your blog’s performance to ensure the best user experience.
3. Optimize image filenames
Wanna hear one of the most important images and SEO tips? When naming images, avoid default names like “IMG_001” and opt for descriptive filenames that convey the content and purpose of the image.
Incorporating relevant keywords that align with the topic of your travel blog can boost image visibility and help search engines understand the context.
For instance, instead of “beach-photo1.jpg,” choose “sunset-beach-cancun.jpg” to describe both the location and scene. Use hyphens rather than underscores to separate words, as search engines interpret hyphens more effectively.
4. Write SEO-friendly Alt text
Alternative text (alt text) is crucial for improving accessibility and SEO. Alt text provides a description that allows visually impaired users and search engines to understand the image’s content.
For the best results:
- Make alt text concise but descriptive, ideally around 10-15 words.
- Include relevant keywords without keyword stuffing.
- Accurately reflect the image’s content to enhance context.
For instance, an effective alt text for a photo of the Eiffel Tower at sunset might be: “Eiffel Tower at sunset with a clear sky in Paris.” This practice ensures your images are more search engine-friendly while providing valuable context.
Where can you add an alt text? If you have access to Yoast or RankMath, it’s as easy as clicking on the photo, heading to the sidebar, and adding it under Settings > Alternative Text (this is for RankMath)
Stuck on the alt text? Use ChatGPT. She Knows SEO has created a ChatGPT prompt called She Knows Alt Text to help you create the perfect alt text for your image SEO.
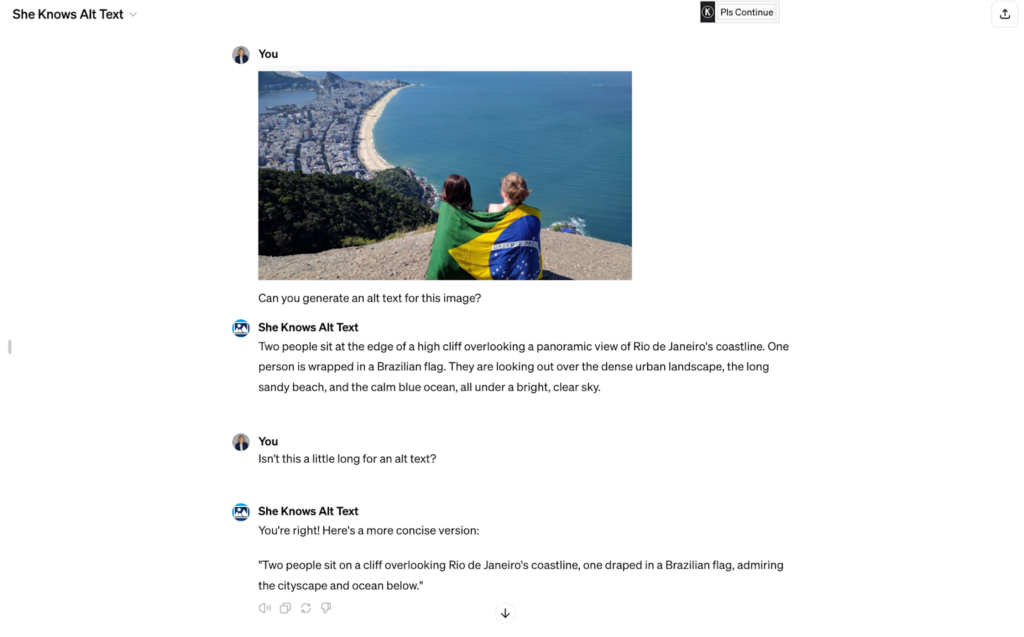
Still a little confused about images and SEO? Here’s what one expert says:

Rahuldev Rajguru, Turuhi.com
“Usually, you don’t need to use caption and description in the image parameters; you can ignore them. Title and alt text ideally don’t need to be exactly the same. Alt text should be a meaningful sentence with just one and the most relevant keyword. It should describe your image in preferably one sentence. These are not thumb rules but good practice.”
5. Set correct image dimensions
For optimal blog post images, make sure the width of the image is matching 80-100% of the available content column width on your website. Commonly recommended dimensions for various image types include:
- Featured images: Typically, 1200×628 pixels work well across most blog themes and ensure compatibility with social media platforms like Facebook and Twitter.
- In-post images: Widths between 600-800 pixels are suggested for images placed within the content to ensure they are large enough for clarity without overwhelming the text.
- Full-width images: To accommodate wide screens and ensure high resolution, images that span the full width of a screen can be up to 2560 pixels wide.
- Infographics: Widths between 600 and 1100 pixels and up to 2000 pixels in height can effectively accommodate detailed visual data.
These dimensions ensure that images are not only visually appealing but also optimized for load times and SEO performance, contributing positively to user experience and page speed.
The cheat sheet below shares standard image sizes for website pages in a desktop version with a resolution 1920 x 1080 px.
| Image type | Image size | Image ratio |
| Background image | 1920 x 1080 pixels | 16:9 |
| Website banner | 250 x 250 pixels | 1:1 |
| Blog image | 1200 x 630 pixels | 3:2 |
| Thumbnail image | 150 x 150 pixels | 1:1 |
6. Compress images
Compressing images reduces file sizes while maintaining acceptable quality, leading to faster page load times. Tools like TinyPNG help compress images in PNG and JPEG formats efficiently, often reducing their size by 50-80% without a noticeable quality loss.
This improves website speed and performance, which search engines consider in rankings. Additionally, smaller images decrease data consumption, enhancing the user experience, especially for mobile visitors.
Here is a comparison of file size and load times for different image formats.
| Image format | Average file size | Average load time on 3G connection |
| WebP | 41.2 KB | 1.77 sec. |
| JPG | 91.5 KB | 2.91 sec. |
| PNG | 552 KB | 9.16 sec. |
| BMP | 1900 KB | 17.22 sec. |
7. Use lazy loading and preloading
Lazy loading delays loading images not initially visible on the screen, loading them only as users scroll down. This reduces initial page load time, improves page speed, and enhances user experience.
Browsers and WordPress now support lazy loading natively through the loading=”lazy” attribute in the <img> tag. If you want something more straightforward (and easier), you can use the WordPress plugin that helps with this.
Lazy Loading can greatly improve the performance of image-heavy travel blogs by ensuring that only necessary resources are loaded upfront. But Lazy Loading has its downsides.
Ahmet Kaplan Elçi, a pioneering SEO expert since the early days of Google and founder of TAXIYO
“Using lazy loading for images is advantageous. However, search engine bots typically crawl content that is active upon the initial load. They decide whether to crawl JavaScript files as a secondary consideration.
In some cases, images with lazy loading are not included in the content by the search engine during the initial load. The content may be categorized as entirely text-based.
The most reliable practice is to avoid using lazy loading for the first 4 images in blog posts. Applying lazy loading to images beyond the first 4 is more reasonable if it’s image-heavy content.”
8. Use captions to enhance user engagement and SEO
Captions can significantly improve user engagement by offering immediate context to your images. This is also a great place to add more keywords to help your Google ranking.
They draw attention to the visual content and can reinforce or expand upon the information within the text. To make the most of captions:
- Keep them concise yet informative, directly relating to the image.
- Include relevant keywords to increase SEO relevance.
- Avoid repeating the same information already present in the alt text or body.
Thoughtfully written captions can enhance storytelling while providing additional SEO benefits for your travel blog.
9. Use browser caching
Leveraging browser caching helps reduce server load and improve site speed by storing commonly used files like images in a visitor’s browser. This allows repeated visitors to quickly load images from their local cache rather than downloading them again, significantly speeding up subsequent page views.
By configuring your server or using plugins to set longer expiration times (e.g., 30 days or more) for static assets like images, stylesheets, and JavaScript files, you improve your travel blog’s performance and user experience.
What plugins do we recommend? W3 Total Cache, WP Fastest Cache, and/or WP Super Cache.
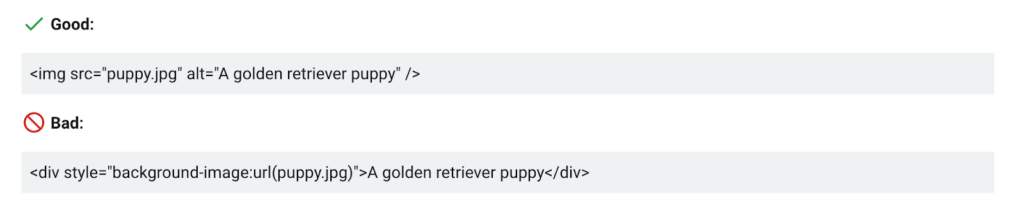
10. Use HTML tags to embed images
Embedding images using proper HTML tags (like <img> for images) is crucial for SEO. This ensures that search engines can correctly index and recognize the images associated with your content. Proper use of HTML tags also helps with accessibility, ensuring all users, including those with disabilities, can understand and interact with your content. Use attributes like src, alt, title, and width/height to provide search engines with detailed information about the images.
These practices are fundamental to enhancing the visibility of your images in search engines, thereby improving your overall site’s SEO performance.
11. Use an image sitemap
An image sitemap is a specialized sitemap that helps search engines index your images more effectively. By creating an image sitemap, you offer search engines direct access to your visual content, enabling them to discover images that might be buried under dynamic content or loaded through JavaScript.
Ensure your sitemap includes each image’s URL, associated caption, title, and license data. This practice significantly enhances your site’s chances of ranking better in Google Images and other visual search engines.
This might sound a little confusing, but don’t worry. If you use WordPress, Rank Math, or Yoast, these plugins already have a sitemap solution.
12. Optimize responsive images
Responsive images automatically adjust based on the user’s device and screen size, offering a seamless viewing experience. By implementing responsive images using the srcset attribute in your <img> tags, you ensure that visitors receive the best-quality images for their devices while avoiding slow loading due to unnecessarily large image files.
This flexibility is important for user experience and SEO, as search engines value websites that deliver fast load times and accessible content across different devices.
If you want to learn more about srcset and how to use it for responsive images, read about it here.
13. Add structured data
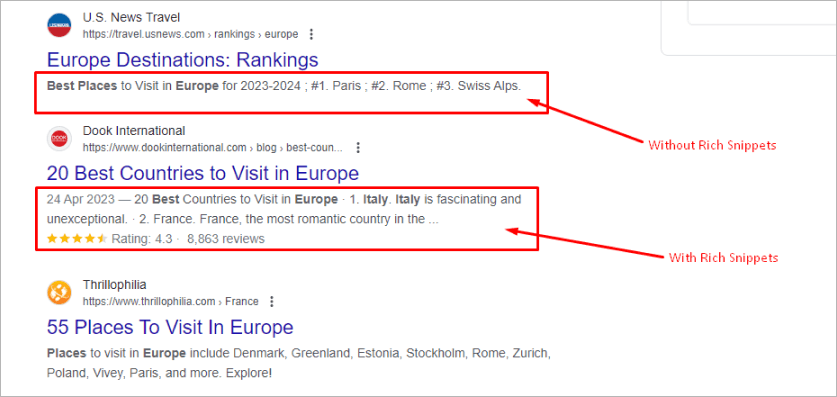
Structured data is a standardized format that provides search engines with additional information about your website content, helping them better understand and categorize it. For images, structured data can enhance your travel blog’s visibility by making it eligible for rich results in search engine results pages (SERPs), such as image carousels.
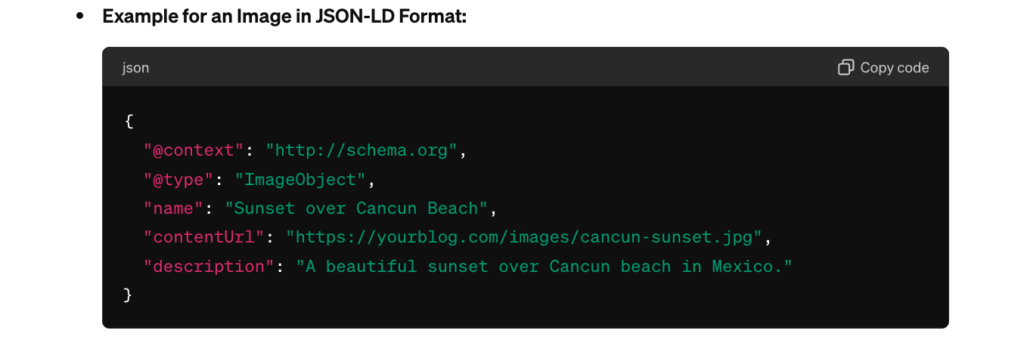
This additional metadata makes images more informative and relevant in search results, enhancing the likelihood of clicks, impressions, and higher rankings for travel blogs. Structured data can also provide information for social media previews and other platforms, further expanding your reach.
WordPress plugins can efficiently integrate structured data for images. Some plugins include WP SEO Structured Data Schema, Rank Math & Schema Pro. These plugins help add structured data, such as the JSON-LD schema, widely recognized by search engines.
14. Serve images via CDN
An image CDN optimizes and delivers images more efficiently by leveraging a globally distributed server network. This ensures that your blog’s visuals (photos and videos) load quickly for all readers, regardless of their geographical location.
For example, let’s say you are a blogger based in London and have many readers in Tokyo, Japan. Normally, when a reader visits your blog, their request has to travel thousands of miles to your server in London. This long distance can lead to slow image loading times.
However, when your Tokyo readers access your blog with an image CDN, the CDN automatically detects their IP address and routes their image requests to the nearest edge server, perhaps in Asia. This dramatically reduces the data travel distance, speeding up the loading process of your images and improving the overall browsing experience.
CDNs like Sirv, Cloudinary, ImageKit, and Cloudflare are excellent choices for bloggers who need reliable image management and delivery.
How to check your site’s images
To audit and optimize your images, start by gathering all the images on your blog. Screaming Frog is a great tool that helps create an image inventory in just a couple of steps. Go to the “Spider” mode and start to crawl your website. Once done, go to the “Images” tab for the complete inventory of your blog’s images. You will see a list of internal and external assets hosted on your domain or an external one accordingly.
When it comes to external hosting, it is fine if you are using a content delivery network (CDN). However, inserting embed codes from other blogs into your platform leads to using unoriginal images of lower quality and is a big no. Besides, if the host removes this image from the server, you won’t have any access to it either. Note that Screaming Frog does not process images via CSS, so make sure to optimize your logos, banner images, and menu icons separately.
You can also check image SEO by running a site audit with tools such as SEMrush. It divides issues into errors, warnings, and notes based on criticality, and identifies seven categories of issues when it comes to image optimization: broken images, pages with slow speed, images without alt attributes, etc.
6 Tools for image SEO
1. Alttext.ai for Alt text
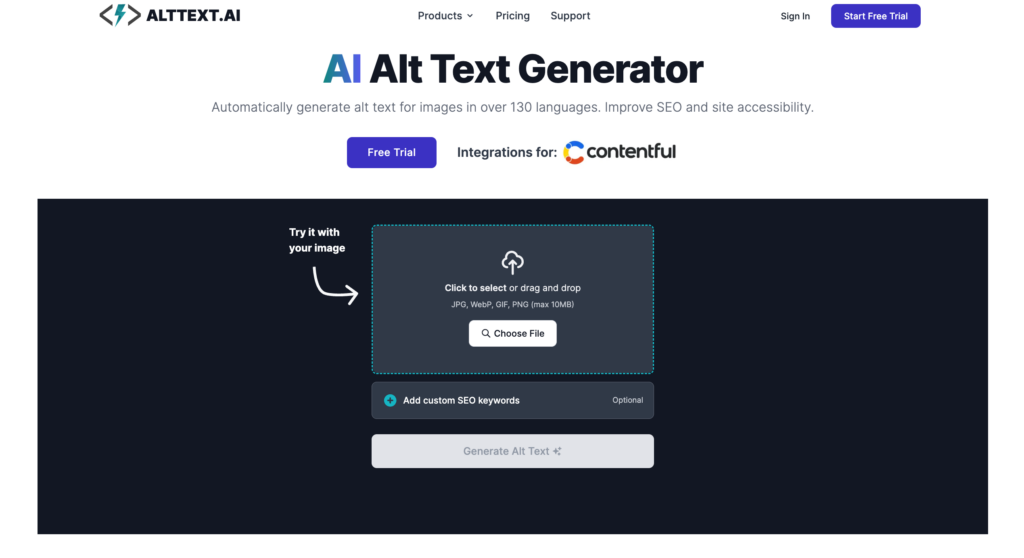
Alttext.ai is an AI-driven platform that automatically generates descriptive alt text for images, enhancing web accessibility and SEO. It analyzes an image’s content and produces a description that captures its essence and context.
Alttext.ai has free and paid versions. The paid version offers more advanced features and higher usage limits. It starts at $5/month and includes 100 credits. You can also buy Credit Packs for $3 per 50 credits.
2. Smush plugin for image optimization
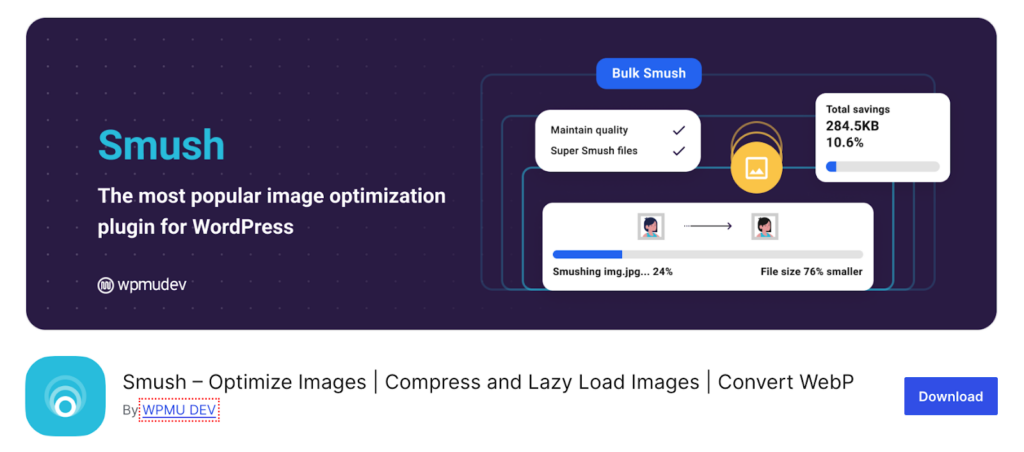
Smush is a widely used WordPress plugin that optimizes images by compressing them without a noticeable loss in quality. It operates by automatically processing images as they are uploaded to WordPress and offering the option to bulk compress existing images in the media library. The compression reduces file sizes, decreasing the page load times.
Smush offers both a free version, which covers basic compression and optimization, and a paid version that includes additional features such as full-size image compression and auto-conversion to next-gen formats
3. ShortPixel for advanced image compression
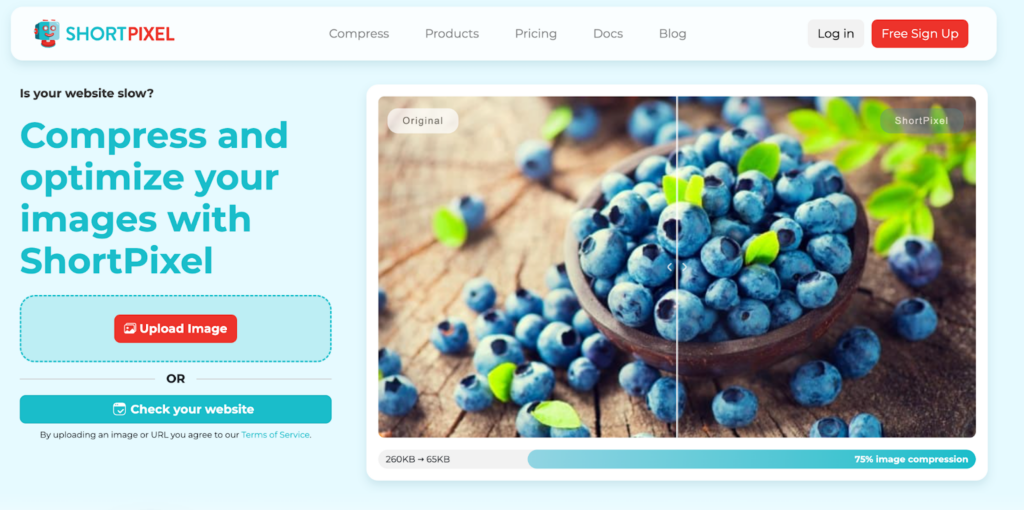
ShortPixel is an image optimization service that reduces image file size without sacrificing quality. It supports various image formats, including JPEG, PNG, GIF, and WebP.
ShortPixel automatically optimizes images as they are uploaded to your website and offers the option to bulk-optimize your existing image library. By minimizing image file sizes, this optimization improves website load speed and SEO performance.
ShortPixel offers both free and paid plans. The free plan provides 100 free credits per month. For paid plans, ShortPixel offers an unlimited monthly plan for $9.99, which includes unlimited credits on unlimited domains.
4. Ahrefs for image SEO monitoring
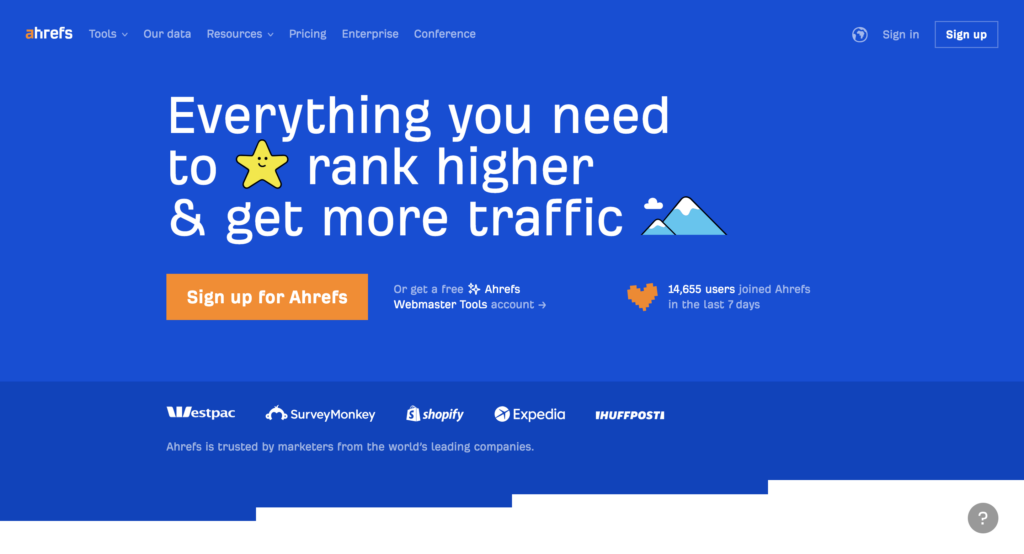
Ahrefs is a comprehensive and popular SEO tool that can track images lacking alt text and monitor other factors affecting SEO for images. It scans your website to identify images that could be optimized for better SEO performance by adding missing alt texts or reducing file sizes. Ahrefs also provides detailed insights into how your images and content rank on search engines, helping you refine your SEO strategy.
Ahrefs does not offer a free version, but it provides a trial for $7 for 7 days. After the trial, pricing starts at $99 per month for the Lite plan, which includes access to most of Ahrefs’ features suitable for individuals or small businesses.
Not ready to pay for images and SEO tools? There is a great workaround:
Kerry Houston Glover, Turks and Caicos Travel Blog, Corks and Tacos
“The free version of Ahrefs (Ahrefs Webmaster Tools) lets you do a site audit and shows which images are missing alt text.
- Sign in
- Click on site audit on the menu options
- Click on your site name
- Click the date of the most recent audit.
If you don’t see “missing alt text” on the main overview, then click on all issues on the sidebar and scroll down to images. It will show you the posts or pages of the missing image alt text, and on the right, it will list the image URLs.”
5. Pixsy for image protection
Pixsy is a service designed to help photographers and content creators detect and combat unauthorized use of their images online. It scans the Internet using image recognition technology to find copies of your images and alert you to potential copyright infringements. This tool is particularly useful for protecting your visual content and ensuring your rights are not violated.
Pixsy offers several plans, including a free tier that tracks a limited number of images and sends alerts about potential unauthorized uses. The paid plans, which start at $19 per month, offer more extensive monitoring and legal support services.
6. Copytrack.com for digital content protection
Copytrack provides a similar program to Pixsy, focusing on tracking and enforcing the copyright of digital images across the web. Copytrack scans the internet for copies of your images and assists in managing copyright infringements through automated licensing or legal resolutions.
Copytrack offers a free initial setup and scanning service with no upfront costs. Revenue is generated through a success-based fee: Copytrack charges a percentage of the recovered compensation from copyright infringements, typically around 30% of the recovered amount.
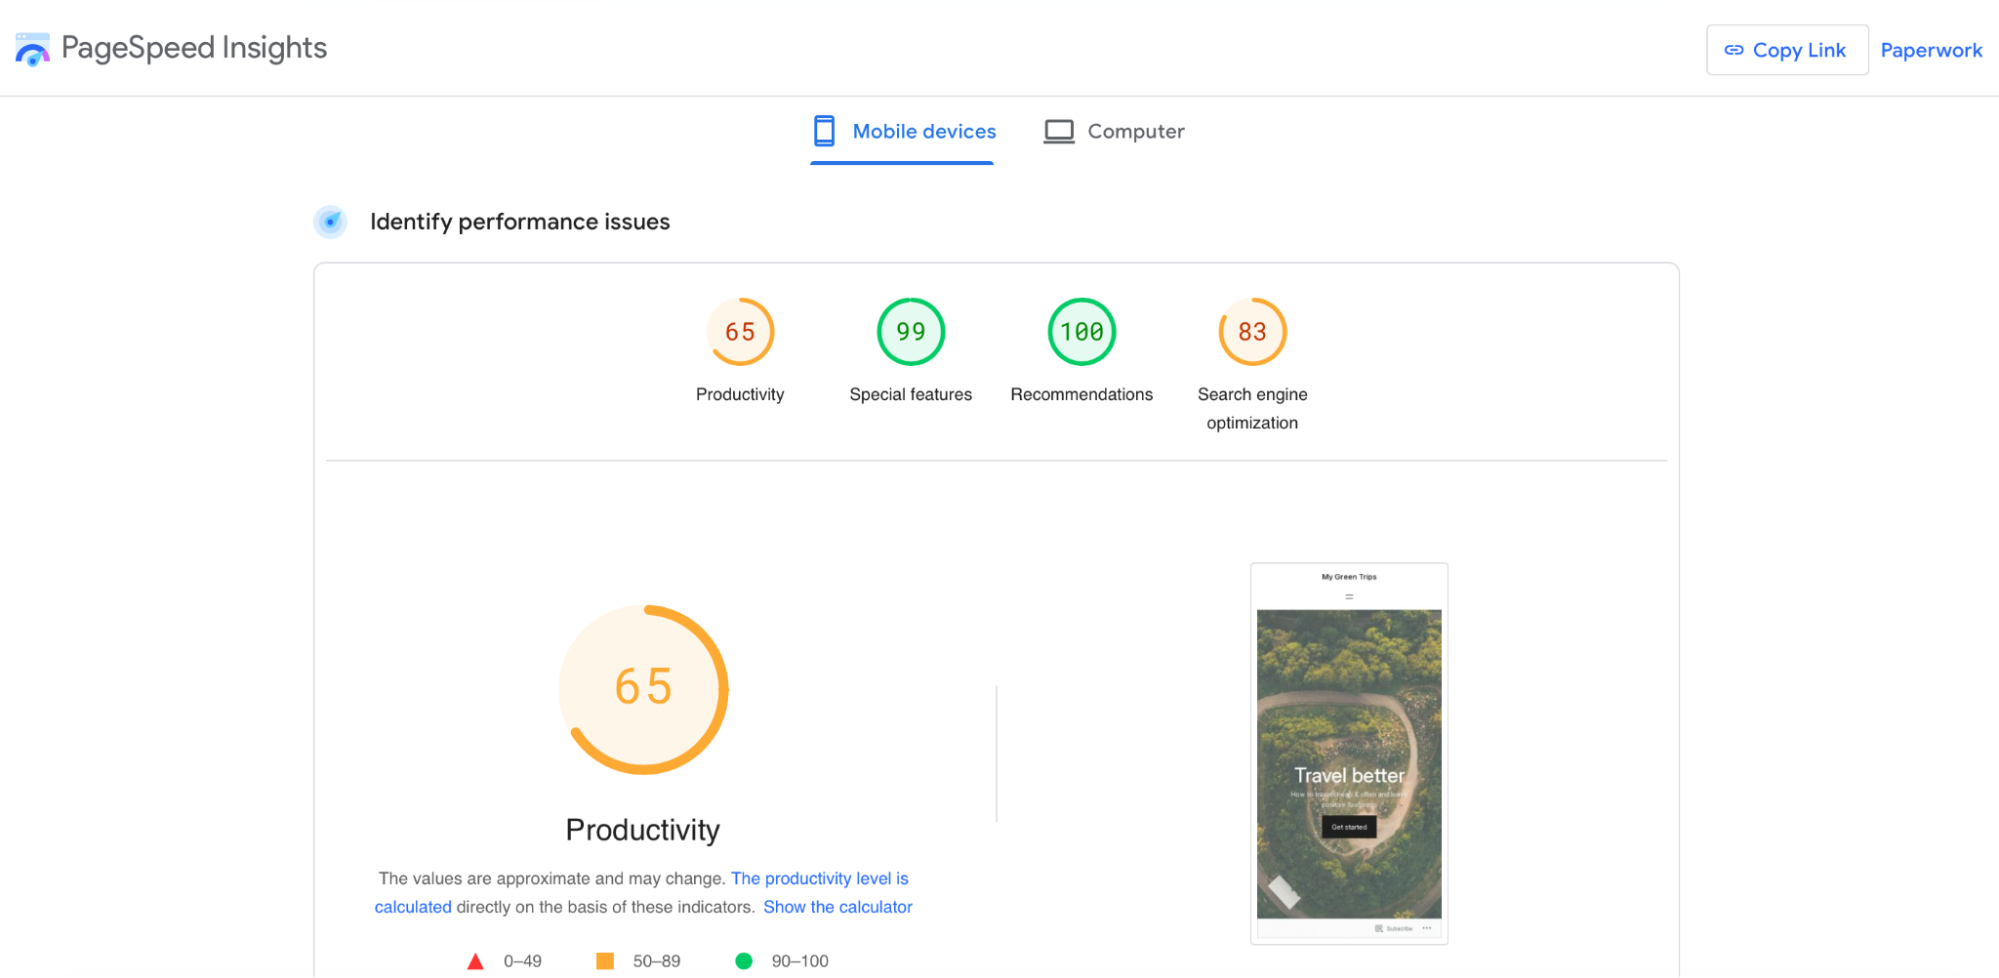
7. Google PageSpeed insights
Google PageSpeed Insights is a free tool by Google that identifies web page issues and provides recommendations to improve its performance. It is a very convenient and quick solution that does not require you to claim your site and can be run for any page. Green color is used for well-performing indicators, yellow shows areas that require improvement, and red indicates critical issues. You will see the following sections:
- Productivity shows potential savings in terms of the file size and page speed. For example, it will indicate images that require resizing.
- Special Features help make your content more accessible for people with disabilities.
- Search Engine Optimization analyzes whether your page aligns with recommended SEO practices. For instance, it shows whether your images have attributes and alt tags.
Final thoughts on image SEO
So, does including images in your blog matter? Ahmet gives us one final example:
Ahmet Kaplan Elçi, a pioneering SEO expert since the early days of Google and founder of TAXIYO
“Take two pages from different domains with equal Domain Authority and Relevance,” he states. “Factors like page speed and freshness then come into play. If one page has too much text while the other contains four well-optimized images besides good text, chances are high that the latter will outdo the former because it is media-rich.”
Embracing the best practices of image SEO truly is a game-changer for your blog. By fine-tuning every picture for optimal performance, ensuring your content shines through clearly, and strategically sprinkling in those backlinks, you’re setting the stage for some serious SEO magic.
The practices mentioned in this article will help enhance your blog’s layouts and designs, iron out any problems, and bring your digital vision to life with clarity. So, buckle up and watch your blog take off—these image and SEO strategies are the key to your online success.