Image Optimization and Photo-Processing Automation
These tips are for all travel bloggers – whether you have three photos or three-hundred photos in your blog.
How to Prepare an Image for Publication
- Make color adjustments and remove gravitational instability to emerge horizons. It will instantly look more professional with these simple manipulations.
- Add your watermark.
- Resize the photos to make them a better fit for your blog’s page size. Heavy images slow down load times and affect bounce rates as a result. As behavioral factors get worse, search engines will decrease your website’s rankings.
- Change the file name to something friendly and recognizable, utilizing keywords. For example, change “DSCH1234” to “palm-on-the-beach.” Google recommends describing the essence of the picture in its <title> to make it possible to rank it in the search. Read detailed recommendations for image optimization on the Google support pages.
- Add meta-tags for images like <title>, <alt> and <caption>. Search engines use <alt> to rank
- Compress your images to make them load faster. You can use the WordPress plugin, Kraken Image Optimizer, to optimize images automatically after they’ve been loaded. It is paid, but a free version is available to try it out on a few images.
Automate Post Processing in Adobe Lightroom
Lightroom is an easy yet powerful tool that allows you to process your photos in batches. It can also align horizons and support presets.
The must-have checklist for processing photos in Lightroom
- Upload your photo set.
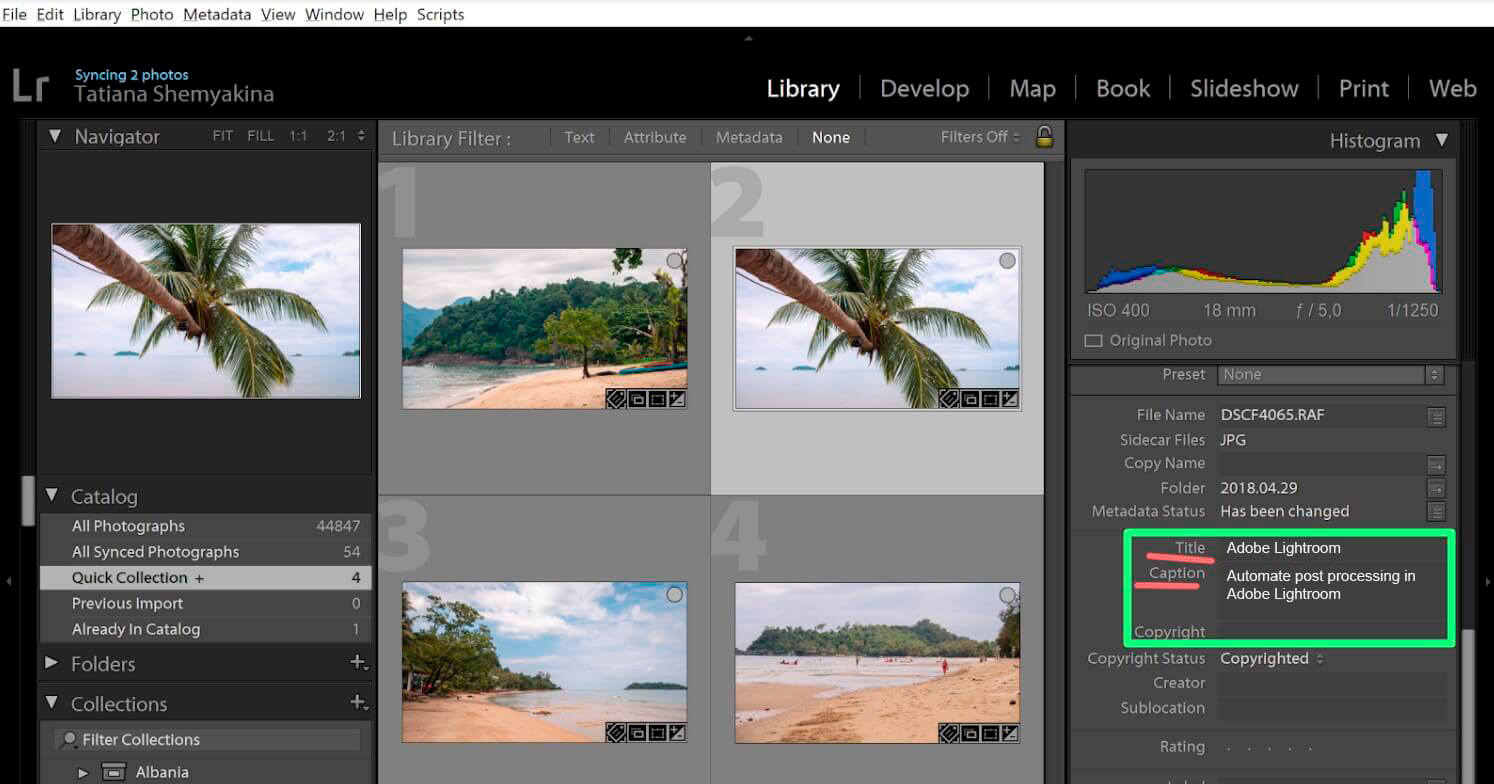
- Process your first photo and write its key phrase in the <caption> and add a short description of the photo in the <title>.

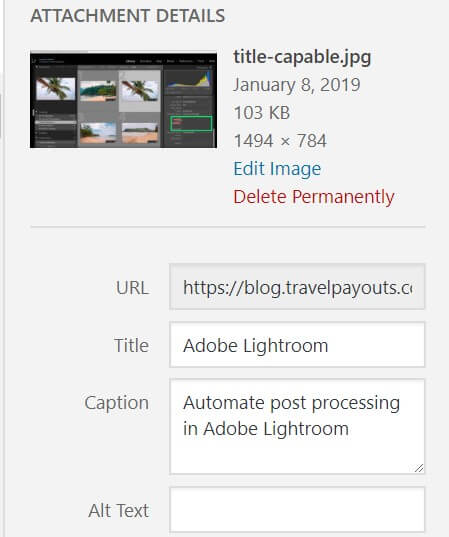
WordPress identifies and records the information from the <title> and <caption> fields by default, but leaves the <alt> attribute empty.

You can use the Automatic image ALT attributes plugin or add a small part of the code in functions.php file to automatically fill in the alt’s field:
add_action( 'add_attachment', 'set_image_meta_upon_image_upload' );
function set_image_meta_upon_image_upload( $post_ID ) {
if ( wp_attachment_is_image( $post_ID ) ) {
$post = get_post( $post_ID );
$image_title = preg_replace( '%\s*[-_\s]+\s*%', ' ', $post->post_title);
$image_alt = preg_replace( '%\s*[-_\s]+\s*%', ' ', $post->post_excerpt);
$image_meta = array(
'ID' => $post_ID,
'post_title' => $image_title,
'post_excerpt' => "",
'post_content' => "",
);
update_post_meta( $post_ID, '_wp_attachment_image_alt', $image_alt );
wp_update_post( $image_meta );
}
}
- Use the settings from your first processed photo as the preset to sync the settings of the whole photo series.
- Export the photo set and use the preset with the size setup and “watermark” replacement. Then, you can individually change the name of each photo.
Automating Video Clip Production
Manually editing video clips may not be worth your time and effort. Using smartphone and desktop apps can be more convenient because they can compile clips and select soundtracks.
Here are a couple free video editors to consider:
1. Adobe Premiere Clip for iOS and Android
Add visual effects like light correction or slow motion to the video clip you’ve picked up in the editor. And “Smart Loudness” is a feature that will smooth volume differences between videos.
2. Quik for iOS and Android
Crop and rotate photos and videos, and add geo marks, captions and emoji to your clips. There are even hundreds of free soundtracks to choose from in its music library.
Here are a couple paid video editors to consider:
3. Filmora
The annual subscription price starts from $40 but the editor has free trial. You can edit videos easily with a variety of effects available.You can also add titles, animation, screensavers and record screens. Additionally, you can conveniently upload pictures for the clip from Facebook, Instagram and Flickr..
4. Movavi
This editor costs $19, but you can also try it for free. Movavi can screen-record videos or get them from external devices like TV-tuners, so you can fill in the frame of the selected movie in the clip.. This editor is a crowd favorite due to its simple user interface.
Check out these online services for voice-over audio. They convert the text into audio tape:
How to Automate Your Work With Content
You’ll have to write your own articles, but it’s possible to (and recommended) to automate SEO optimization and track “broken” links.
Optimizing SEO for Your Articles
Install the Yoast SEO plugin for WordPress to optimize articles for the search engines. It will allow you to look through the snippet’s preview, track the number of key words in the text and add meta-tags. It will also create an XML sitemap and “breadcrumbs.”
Having Content on Hand
Keep up with the articles that you’ve already published. . The “broken” links appear when partner offers close or because of resource locking. You can monitor spam and links posted by commentators that may try to raise money from your blog.
Install the Akismet plugin to filter spam in comments. It automatically locks anything that looks like spam. You circle back through logs to unblock the normal comments or manually block ones that the plugin misses.
Check out our picks for plugins that work with links:
- Broken Link Checker — Tracks “broken” links.
- Better Search Replace — Replaces one text line for another on its site in a couple of minutes.
Here are plugins that work with affiliate links: Affiliate links and Pretty links.
Plugins are similar – they can help you can reduce links using your domain name as well as set redirects 301/302/307.
Learn more about redirection and links settings here.
Automating the Distribution of Published Articles
Here are plugins you can use to share your published article across your social platforms:
- Social Network Autoposter. It’s compatible with Facebook, Instagram, Reddit, Medium, MailChimp and other services and social media.
- IFTTT is the “Swiss army knife” of cross posting. It works with Facebook, Twitter, Blogger, Tumblr, Pinterest and many other social platforms.
Use Templates
We’ll conclude with one main piece of advice – reduce your daily grind by automating to the max!
- Make PSD-templates to create capital images for your blog articles, social media and YouTube.
- Prepare templates if you write similar regularly.
- Make templates for video clips you edit manually. Even adding the blog logo in the video editor can save a lot of time .
- Collect checklists for standardized actions so you save time and reduce mistakes in day-to-day tasks.
In the comment section, share your experience on how you optimize and automate work with travel blogs.

